HOW TO REPLACE CONNECTORS:
SEALED CONNECTORS -
In the Below article, we go through a step by step guide on replacing worn, broken or damaged sealed connectors. This information applies to all sealed LS connectors which can be purchased from our shop HERE
- Before you begin, ensure the new connector is the correct part. Inspect them side by side and if necessary, insert the unpinned new connector in the intended sensor. Most connectors will have Letters marking each cavity, beginning with “A”, cut the old connector and prepare to crimp on the new terminal. Crimping and pinning these connectors one by one avoids any confusion and incorrect pinning.

- Once cut, strip approx 3mm of insulation from the wire to reveal the conductor strands, slide on the seal to be flush with the stripped cable as below.


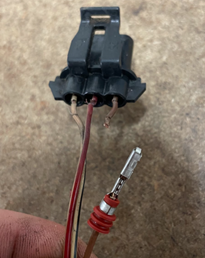
Insert the wire into the new terminal ensuring the copper strands are inline with the smaller crimp area and the seal lines up with the larger crimp area.

- using the correct crimping tool firmly crimp the terminal firstly onto the copper conductor stands using the appropriate die, then changing the die used and crimping firmly the seal. The end result should look like the below image . Holding the connector from the mating end, lightly tug the wire to ensure the crimp sufficiently holds the connector to the wire.
- Insert the terminal gently into the same marked cavity on the new connector. DO NOT USE EXCESSIVE FORCE. If the Terminal does not want to seat, change the orientation and try again. You should feel and hear a slight click when the terminal is locked in.

- Repeat the above steps for the remaining wires, one by one. Once all cavities are occupied, clip on the TPA (Terminal Position Assurance) Lock to the rear of the connector. Compare the new connector to the old and that the colours match the removed connector.

- If you make a mistake, these terminals can be removed with speciality de pinning tools OR in most cases, with some welding wire and some patience. Please note, this technique applies to ALL connectors of this family, not just the connector pictured.

Use left/right arrows to navigate the slideshow or swipe left/right if using a mobile device
